How to Make Sauerkraut (Beginner Method) (2026)
By June Park · Updated September 2026
Independent editorial guide. We never accept payment for coverage, though we may earn a commission if you purchase through our links.
Quick Take
Sauerkraut is the easiest ferment to start with, and it comes down to two ingredients and one ratio: cabbage and salt, at 3 tablespoons of canning or pickling salt per 5 pounds of shredded cabbage. Salt the cabbage, pack it down until its own brine rises to cover it, keep it fully submerged and away from air, and let it ferment at cool room temperature for three to four weeks. That is the entire method.
The salt and the submersion are not seasoning choices; they are the safety mechanism. They let the good lactic-acid bacteria take over and drop the pH low enough that nothing harmful can grow. Get the ratio and the submersion right and sauerkraut is one of the safest things you can make at home.
Below: the full step by step, how to keep the cabbage under the brine, how to tell when it is done, and the gear that makes it foolproof. See picks ↓

Sauerkraut has been made in kitchens for centuries with nothing but a crock and some salt, which tells you how forgiving it is. But forgiving is not the same as arbitrary: the reason it works, and the reason it is safe, is a specific bit of food science that is worth understanding before you start.
Shredded cabbage is covered in wild lactic-acid bacteria. Salt at the right concentration holds back spoilage organisms while those bacteria thrive without oxygen, eating the cabbage's sugars and producing lactic acid. That acid is what preserves the kraut and, per the National Center for Home Food Preservation, drives the pH below the level where dangerous bacteria can survive. Your whole job is to set up that environment and stay out of its way.
New to fermenting in general? This is the perfect first project. If you would rather compare gear first, see our guide to the best fermentation kit for beginners.
Why salt and submersion are the whole safety story
Two variables keep sauerkraut safe, and both are in your control. The first is the salt ratio. Too little salt and spoilage bacteria and yeasts can outcompete the good ones, giving you soft, off kraut; too much and you stall the fermentation entirely. NCHFP's tested ratio, 3 tablespoons of salt per 5 pounds of cabbage, hits the roughly 2 percent brine where lactic-acid bacteria win. The second is submersion. Fermentation is anaerobic, so the cabbage must stay under its brine, away from air; the surface, where air meets brine, is the only place mold or yeast can take hold. Keep the kraut submerged and correctly salted and the acid it produces does the rest.
Equipment for a first crock
- Fresh green cabbage - about 5 pounds, which yields roughly 2 quarts of kraut. Late-season, dense heads work well.
- Canning or pickling salt - not table salt. Iodine and anti-caking agents can darken the kraut and cloud the brine.
- A fermentation vessel: a wide-mouth mason jar with a fermentation kit, or a traditional water-sealed crock for bigger batches.
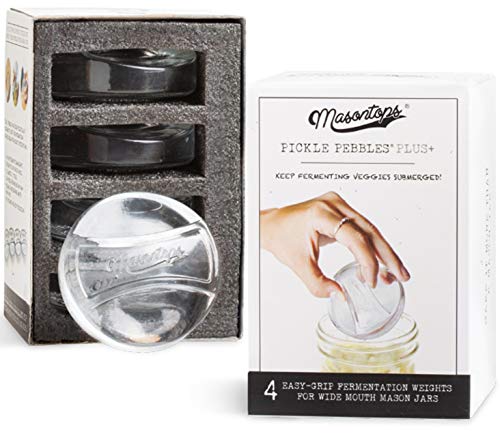
- A way to keep the cabbage submerged: glass fermentation weights, a water-filled bag, or the stone weights a crock comes with.
- A clean kitchen scale (to weigh cabbage for the ratio) and a sharp knife or mandoline.
Step 1: Shred and salt
Discard the outer leaves, quarter and core the cabbage, and shred it about the thickness of a quarter. Weigh it so you can match the salt ratio, then work in 3 tablespoons of salt per 5 pounds. Toss thoroughly and let it sit for 15 to 30 minutes; the salt pulls water out of the cabbage and starts building the brine. Then massage or press firmly, and you will feel it go limp and wet as its liquid releases.
Step 2: Pack it down under the brine
Pack the salted cabbage firmly into your jar or crock, pressing out air pockets as you go, until the brine rises above the cabbage. Leave a few inches of headspace for bubbling. Set your weight on top so everything stays submerged by an inch or two. If the cabbage did not release quite enough liquid to cover it, top it off with extra brine made from 1.5 tablespoons of salt dissolved in a quart of water, boiled and fully cooled. Nothing solid should be poking up into the air.
Step 3: Ferment cool, and be patient
Keep the vessel at cool room temperature, ideally 65 to 75F, out of direct sun. Fermentation is fastest and most reliable in that range: figure 3 to 4 weeks at the warmer end, longer if your kitchen is cooler. Below about 60F it may barely start; much above 75F it can soften or spoil. You will see bubbles within a few days, that is the fermentation working. Check every few days that the cabbage is still submerged, and skim off any thin white surface film (kahm yeast) if it appears; the kraut below the brine is unaffected. Fuzzy or colored mold is a different matter, and the FAQ below covers when a batch has to be thrown out.
Step 4: Know when it is done, and store it
The kraut is ready when the bubbling has stopped and it tastes pleasantly sour and no longer raw; taste it weekly from week three on and stop whenever you like the flavor. Then refrigerate it, where it keeps for months and slowly mellows. If you want it shelf-stable, finished sauerkraut is acidic enough to be water-bath canned (hot pack, roughly 10 minutes for pints and 15 for quarts at sea level, adjusted for altitude), though many people find refrigerating it keeps the texture and the live cultures better.
The gear that makes it foolproof
You can make great kraut in a mason jar. A mason jar fermentation kit adds glass weights and an airlock lid that vents CO2 while keeping air out, which removes the two things beginners fumble. For bigger or repeated batches, a water-sealed fermentation crock is the traditional vessel, and its stone weights do the submerging for you. The one accessory worth buying no matter what is a set of fermentation weights, because staying submerged is what actually keeps a batch safe.
Is mold on sauerkraut safe to eat?
Treat fuzzy, colored mold (blue, green, black, or pink) as a reason to throw the batch out. You cannot reliably scrape mold off a soft, wet ferment the way you can off a hard cheese, so on sauerkraut the safe move is to discard it. A thin white or cream film on the surface is a different thing, usually kahm yeast, which is harmless: skim it off and press the cabbage back under the brine. Cloudy brine and a yeasty smell early on are also normal. What tells you a batch has actually gone bad is fuzzy colored mold, a rotten rather than sour smell, or sliminess, and any of those means throw it out and start over. A healthy batch resists all of this thanks to the acid it produces plus the roughly 2% salt brine, so the real fix is almost always better submersion and the correct salt ratio, not trying to rescue a spoiled jar.
How much salt do you need for sauerkraut?
The tested ratio is 3 tablespoons of canning or pickling salt per 5 pounds of shredded cabbage, which comes out to about a 2% brine by weight. Weighing is more reliable than measuring by the spoon, because salt types vary a lot in density, a tablespoon of fine table salt weighs far more than a tablespoon of coarse flake. Our fermentation brine calculator does the math for your exact weight of cabbage and salt type.
Recommended
Products related to this guide.

What owners say
Real owner reports from the threads and editorial sources we drew on for this guide.
“You are fine at room temperature. It will just ferment a little faster. I would start tasting it around day 10-12 and go from there. Often in the summertime my sauerkraut is done by 12-14 days.”
— r/fermentation / u/Brain_Aggravating
“just taste test around day 10 and you'll know if it's done!”
— r/fermentation / u/58catsanddogs
“Glass fermentation weights are cheap. Why waste time in failure or risk your health?”
— r/fermentation / u/Electrical-Visual438
“The weight should be submerged fully. Get something flat to replace that cylinder.”
— r/fermentation / u/skittles014
“Keep an eye on the weight to make sure mold doesn't grow on it.”
— r/fermentation / u/Substantial-Basis179
Sources
NCHFP / USDA: Making Sauerkraut · National Center for Home Food Preservation (NCHFP)